SCRAPPIN' GREAT DEALS
Canada Day Week-Long Celebration - Save 15% Store-Wide!!
This week is Canada's 143rd Birthday and we are having a week long store-wide event!!
From now until Sunday, July 4th at midnight you will enjoy savings of 15% store-wide on all regular priced items!!
For a full week everything in our store is on sale!
You read that right ....
if it hasn't been marked down; you will receive 15% off!!
In other words - every single item in the store is on sale - including everything that's NEW!!
(excluded: pre-order items; clearance & daily sale items)
Please Note: There is no coupon to use for your 15% savings & you can shop as often as you like!!
Your 15% savings, on regular priced items, will be calculated manually from our end.
This means that your shopping cart online will not show the 15% savings.
Once your order is pulled, we will email you with your new total & a detailed invoice will be shipped with your parcel.
If an item in your shopping cart hasn't been already reduced, we will manually deduct 15% for you!!
When aiming for FREE shipping ($125+ before taxes within Canada); please remember
to include the calculation of your 15% savings
Next 12 Hour sale will be held Thursday, July 8th
Please Note:
offer cannot be combined with other store coupons/discounts/pending orders
Sale ends Sunday, July 4th @ midnight
pick-up orders - please allow a minimum of 24 - 48 hours for order processing
excludes gift cards/crops/classes/preorder items
June 28, 2010
June 13, 2010
Come and join me at Scrappin' Great Deals!
On June 19th from 10am to noon, I will be hosting a FREE Make 'n' Take at Scrappin' Great Deals! No need to register, just come on out and join in on the fun!
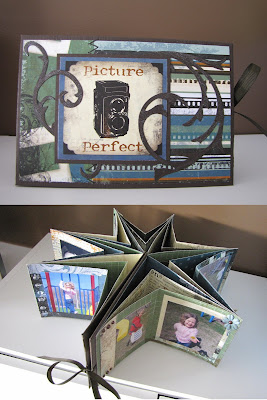
Then, from 12:30 to 3pm, I will be doing a Star Album class using the gorgeous new line from Bo Bunny - Mamarazzi! Cost is $30 + tax. Kits with full instructions can be ordered if you can not make the class. Preregistration is required. Contact SCRAPPIN' GREAT DEALS by phone at 519-473-5751 or register in person!

Then, from 12:30 to 3pm, I will be doing a Star Album class using the gorgeous new line from Bo Bunny - Mamarazzi! Cost is $30 + tax. Kits with full instructions can be ordered if you can not make the class. Preregistration is required. Contact SCRAPPIN' GREAT DEALS by phone at 519-473-5751 or register in person!

June 07, 2010
Not what I had intended to make...
but sometimes you just have to go with the flow!
So I was able to sneak away this weekend for a little R 'n' R that turned more in to a scrap frenzy. I was hoping to get some samples done for some upcoming classes at Scrappin' Great Deals, but got an order for some cards at the eleventh hour. :)
So, here are the cards.
Thank you cards ordered by a friend that is on crutches.
 Inside is blank.

Inside of this card reads... for all of your help while I was off my feet!
University Graduation Card


And now I shall go work on the Star Album and an idea for a Make 'n' Take!
So I was able to sneak away this weekend for a little R 'n' R that turned more in to a scrap frenzy. I was hoping to get some samples done for some upcoming classes at Scrappin' Great Deals, but got an order for some cards at the eleventh hour. :)
So, here are the cards.
Thank you cards ordered by a friend that is on crutches.
 Inside is blank.
Inside of this card reads... for all of your help while I was off my feet!
University Graduation Card


And now I shall go work on the Star Album and an idea for a Make 'n' Take!
June 01, 2010
June 1st and the new monthly kit from SCRAPPIN' GREAT DEALS is ready and waiting for you!

I was so excited when Sheila asked me if I wanted to design with the June Kit. I miss having the regular design team, but I do love seeing all of the creations of Sarah, our resident designer, and YOU the customer! But, every now and then I like to have my turn again!
This kit was so full of goodies. I managed 4 layouts and still have a ton left over. So, without further adieu...

On this layout, I wanted to show that you can use a full, bold patterned paper all on its own. I used a Gelly Roll Stardust Clear Roll-on Glitter Pen to add a subtle glitter to everything! I outlined the title letters, the layout itself, the matte around the photo, and I also used it to add glitter to the flowers. You just have to see it IRL!

For this layout, I used the Bazzill Cardstock for the foundation, but when I was done it just looked "not finished." I ended up crumbling and crunching and distressing the edges, until I ended up with a worn and tattered look. IRL, the paper almost looks like a sheet of chocolate brown leather now! I added the Maya Road library pocket and card. I picked them up at the Great Lakes Mega Meet in Novi last month, but I know Sheila is looking in to bringing them in to the store as well.

WOW! I never thought I would love a layout so much that was one die cut, one photo, one flower, and two cards cut from one other piece of paper! All of the colours just worked so well together that I just couldn't bring myself to add anything more. Ok, I used my Gelly Roll Stardust Clear Roll-on Glitter Pen again to add glitter to the flower! I love those things.

So, my last layout does not look like what I had in my head when I started, but that is what I love about papercrafting... it doesn't have to as long as we are happy with the end results. And, I am.
My sweet Elsie took the time out of an Easter Egg Hunt on the Port Stanley Easter Train to pick me some flowers. What a kid!

I was so excited when Sheila asked me if I wanted to design with the June Kit. I miss having the regular design team, but I do love seeing all of the creations of Sarah, our resident designer, and YOU the customer! But, every now and then I like to have my turn again!
This kit was so full of goodies. I managed 4 layouts and still have a ton left over. So, without further adieu...

On this layout, I wanted to show that you can use a full, bold patterned paper all on its own. I used a Gelly Roll Stardust Clear Roll-on Glitter Pen to add a subtle glitter to everything! I outlined the title letters, the layout itself, the matte around the photo, and I also used it to add glitter to the flowers. You just have to see it IRL!

For this layout, I used the Bazzill Cardstock for the foundation, but when I was done it just looked "not finished." I ended up crumbling and crunching and distressing the edges, until I ended up with a worn and tattered look. IRL, the paper almost looks like a sheet of chocolate brown leather now! I added the Maya Road library pocket and card. I picked them up at the Great Lakes Mega Meet in Novi last month, but I know Sheila is looking in to bringing them in to the store as well.

WOW! I never thought I would love a layout so much that was one die cut, one photo, one flower, and two cards cut from one other piece of paper! All of the colours just worked so well together that I just couldn't bring myself to add anything more. Ok, I used my Gelly Roll Stardust Clear Roll-on Glitter Pen again to add glitter to the flower! I love those things.

So, my last layout does not look like what I had in my head when I started, but that is what I love about papercrafting... it doesn't have to as long as we are happy with the end results. And, I am.
My sweet Elsie took the time out of an Easter Egg Hunt on the Port Stanley Easter Train to pick me some flowers. What a kid!
Subscribe to:
Comments (Atom)


